LEDs For Beginners – Simple Wiring and Calculation
One of the first projects you probably want to make with some electronic components is to make something glow. Glowing stuff is allways nice. 😉 Maybe you allready fried some LEDs by connecting them directly to a power source… At least I did when I began exploring electronics. Ups, the LED is gone… 😉
“A LED and a battery going to a pub…”
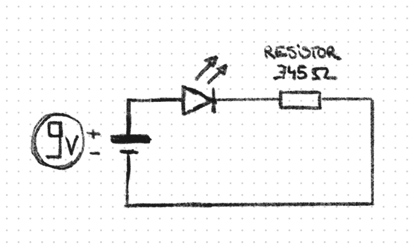
A very simple LED circuit looks like this:
You allways need a resistor before the LED because if there is none the current, that flows will destroy the LED.
Since life isn’t that simple there are ton of different resistor values available and the value you need is dependend on the power suppy voltage and the current and voltage the LED needs. Uaaggh…
A nice guy whos name was Georg Simon Ohm created a formula that will help us there. Its named after him the “Ohms Law” and it looks like this:
I = V / R
We will need to modify this so we get the resistor value (R) like this:
V / I = R
Sooooo:
(Power source Volts – LED Volts) / (Current / 1000) = Resitance we need
You allways need these values before you begin:
- Power supply voltage
- LED Voltage (often something between 2 – 3.2V)
- LED Current (often something between 15 – 30mA)
You get these values from the packaging or suppliers website of the LEDs you have at hand.
So lets say we have a 9V battery a white LED which needs 3.2V and has a forward current of 25mA the formula will look like this:
(9 – 3.2) / (25 / 1000) = 232 Ohm
One LED isnt good enough for me! I demand much more!
If we want to connect more than one LED to a power supply we need to think ahead a little more.
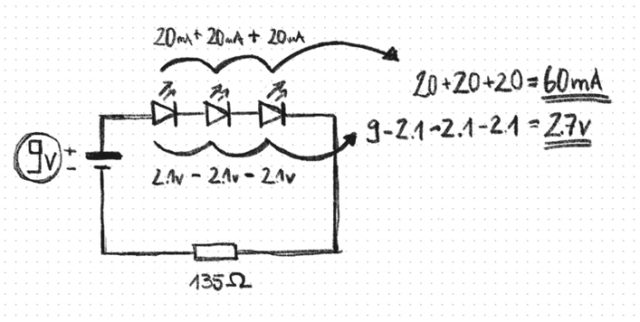
Lets connect 3 LEDs with these values:
- Power supply Voltage 9V
- LED Voltage 2.1V
- LED Current 20mA
We are going to connect them in “series” (which means they are connected after each other) like this:
We calculate the resitor like this:
(9 – 2.1 – 2.1 – 2.1) / (20 /1000) = 2.7 / 0.02 = 135 Ohm
For each LED in the branche we subtract from the power supply; in our case 3 times. The mA stay the same.
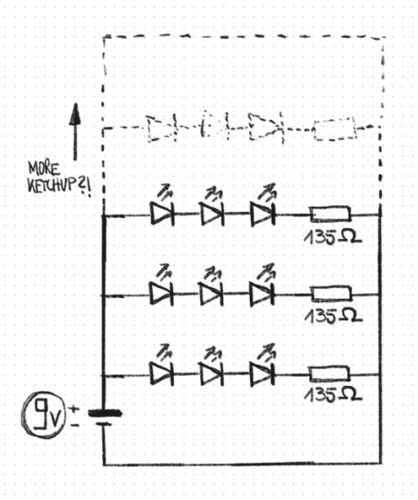
If you want even more we need to make more “branches” (“in parallel” to be exact) it will look like this:
Each of these branches can not exceed the supply voltage if you add up all the voltage each LED needs. If it would exceed the supply Voltage we can just make a new branch (which is called “in parallel”) a we are fine.
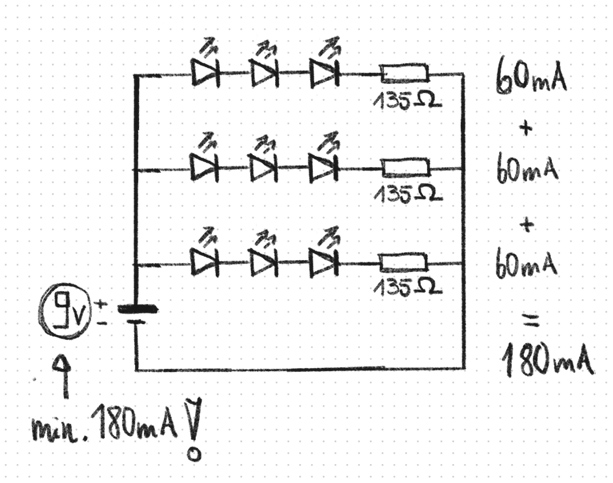
But there is something we need to consider when we are going crazy with our LED count: we allways need to add up all the mA each LED needs and then compare this number to the mA that the power supply is rated.
Lets say we have 30 LEDs each of them needs 25mA. In total they would need 750mA. If your power supply is rated 1A or 1000mA (its the same) you are good if there is nothing else in the circuit. Otherwise you need a power supply that can deliver at least the number of ampse the LEDs needs in total!


